Introduction
This manual describes the process to create a Basic Node or a staked Masternode. It also outlines how to access the Matrix AI Network mainnet as well as various stake methods and processes for Mining and Verification Masternodes.
Browser and Wallet
Browser address: https://tom.matrix.io
Web Wallet address: https://wallet.matrix.io
Basic Nodes
Consumer grade home desktops and laptops are sufficient to serve as Basic Nodes.
Node Configuration
CPU: Quad core
RAM: 8G
Hard disk: 500 GB
Client Files
Download link: https://github.com/MatrixAINetwork/GMAN_CLIENT
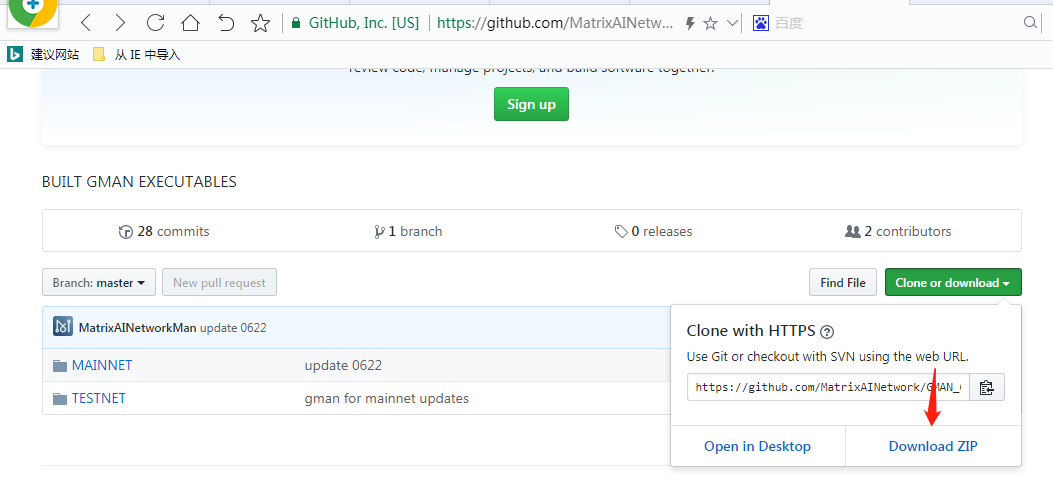
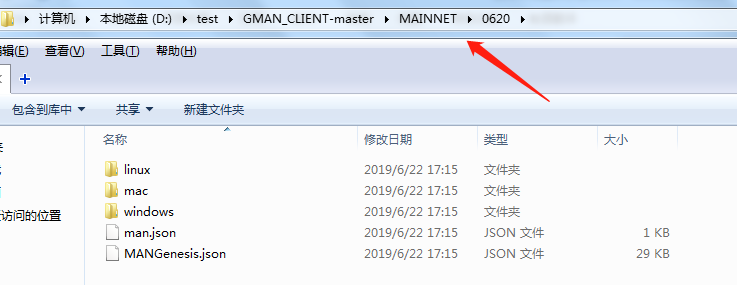
Extract relevant client to the current folder. Use version 0620.
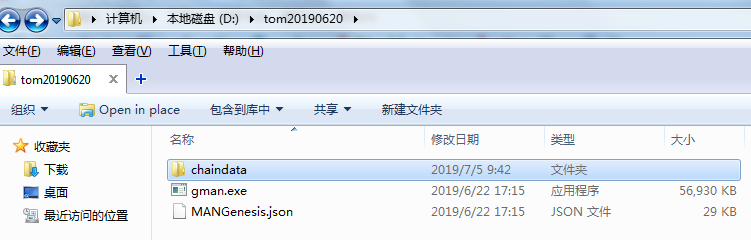
Launch in Windows
- Create a new folder. Copy MANGenesis.json (version 0620) and gman.exe. Create a subfolder named chaindata. Copy man.json to the new chaindata folder.The directory structure should be as follows:

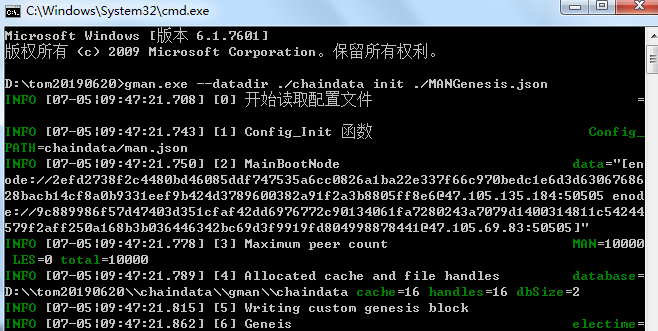
- Open Command Prompt (cmd) and input the following initialization command:
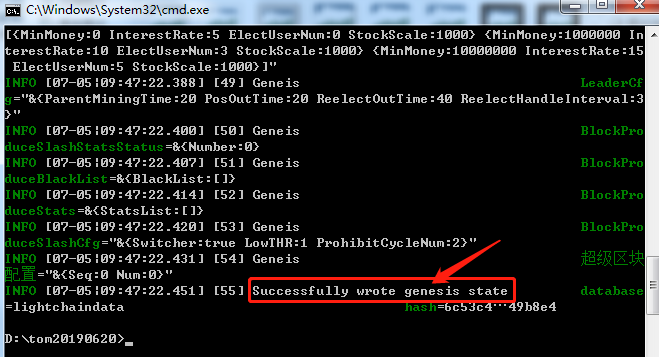
1 | gman.exe --datadir ./chaindata init ./MANGenesis.json |
- Launch gman.
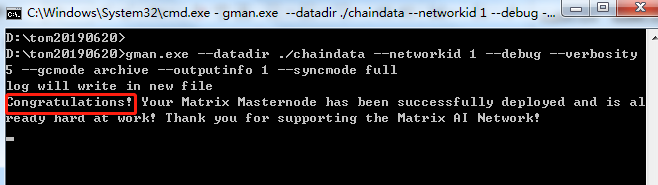
1 | gman.exe --datadir ./chaindata --networkid 1 --debug --verbosity 1 --gcmode archive --outputinfo 1 --syncmode full |
Note: Parameter
--rpc --rpcaddr 0.0.0.0 --rpccorsdomain '*'opens RPC interface service for gman.Default port is 8341.
- After launching gman successfully, open another Command Prompt window and input the following to enter the interactive terminal:
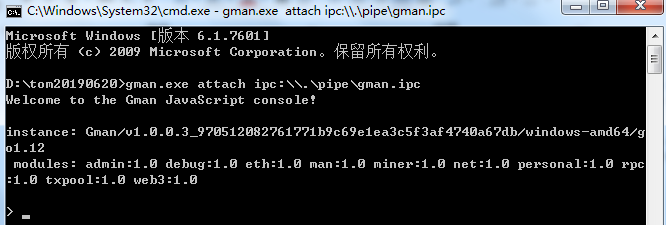
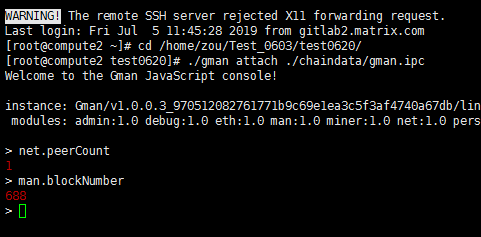
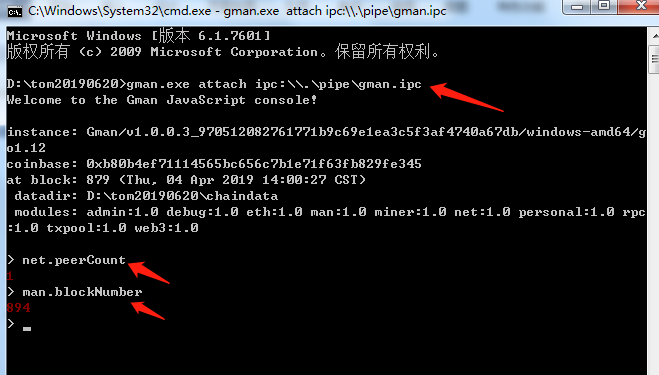
1 | gman.exe attach ipc:\\.\pipe\gman.ipc |
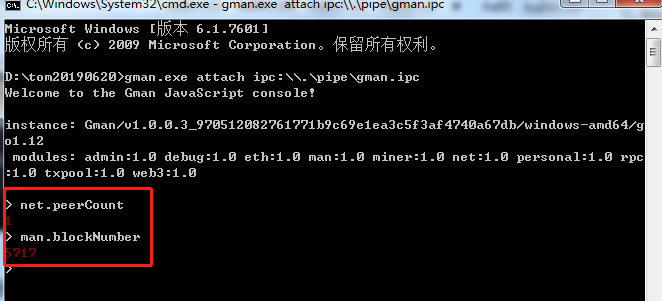
- Input net.peerCount to view the number of connected nodes; man.blockNumber to view the block height (an increasing block height indicates that synchronization with the chain has begun and that gman is successfully deployed).
Launch in Linux & Mac
- Install lrzsz (A tool that transfer files between Linux servers and Windows).
1 | yum -y install lrzsz |

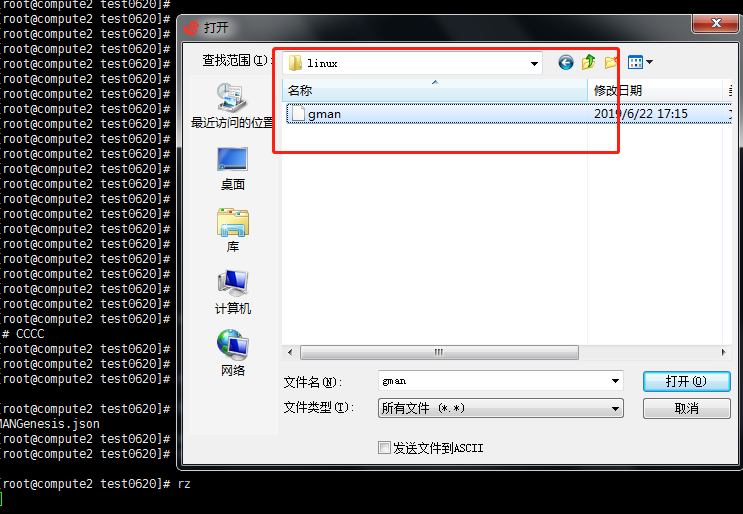
- Import MANGenesis.json with lrzsz.
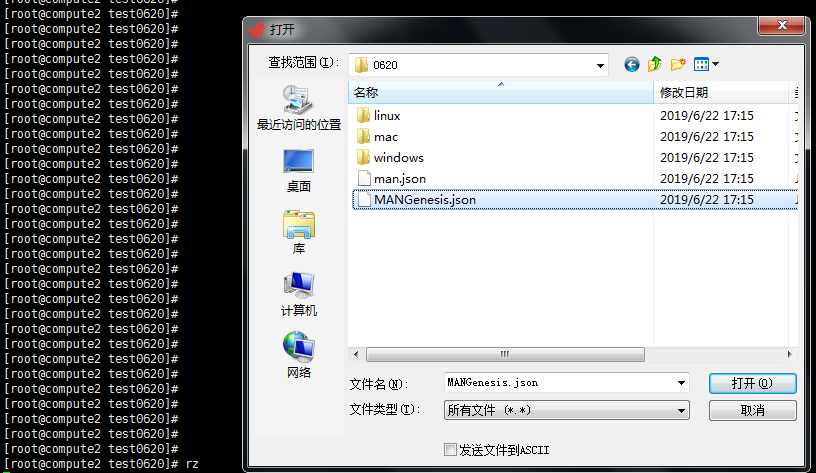
- Import gman with lrzsz.

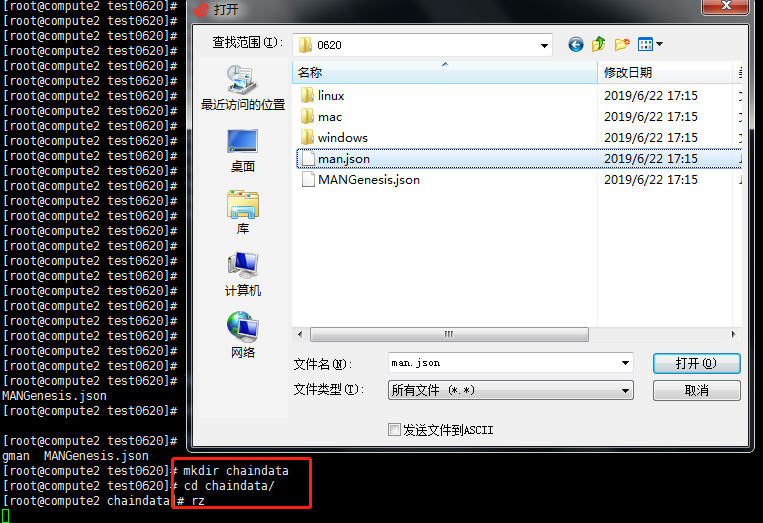
- Create chaindata folder and place man. json into this folder.
1 | mkdir chaindata |
- Modify gman permissions.
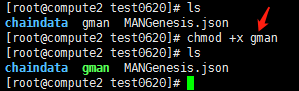
1 | chmod +x gman |

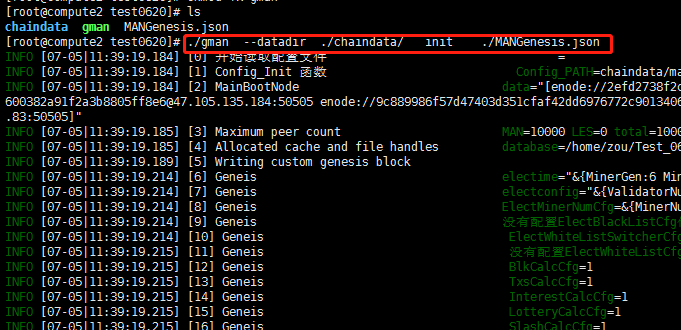
- Initialize MANGenesis.json.
1 | ./gman --datadir ./chaindata/ init ./MANGenesis.json |
- Launch gman.
1 | ./gman --datadir ./chaindata --rpc --rpcaddr 0.0.0.0 --rpccorsdomain '*' --networkid 1 --debug --verbosity 1 --gcmode archive --outputinfo 1 --syncmode full |
Note: Parameter
--rpc --rpcaddr 0.0.0.0 --rpccorsdomain '*'opens RPC interface service for gman.Default port is 8341.

- After launching gman successfully, open another Terminal and input the following to enter the interactive terminal:
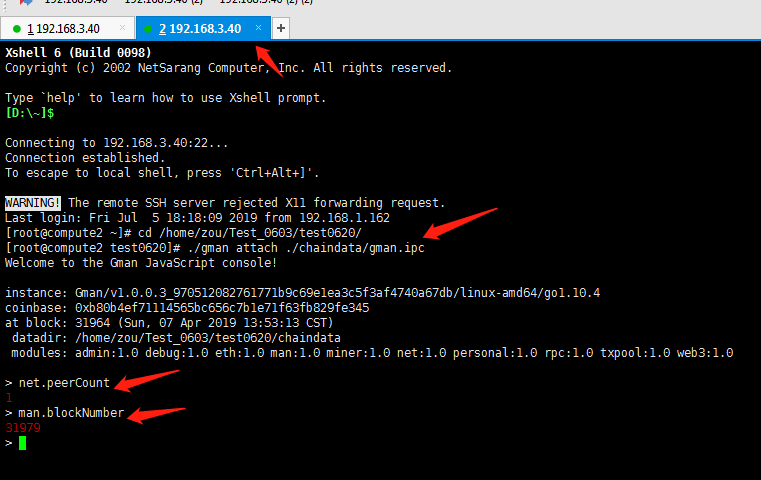
1 | ./gman attach ./chaindata/gman.ipc |
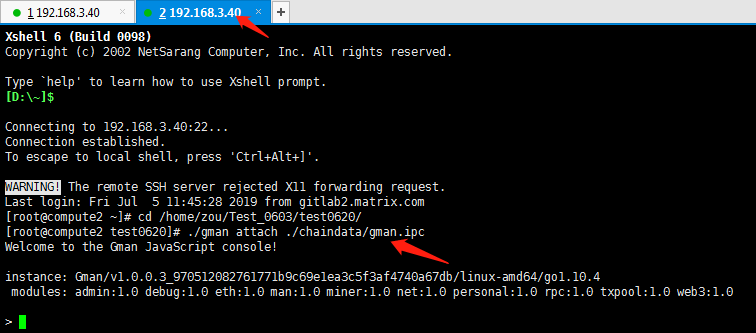
- Input net.peerCount to view the number of connected nodes; man.blockNumber to view the block height (an increasing block height indicates that synchronization with the chain has begun and that gman is successfully deployed).
Mining/Verification Masternodes
Preconditions
A dedicated network environment (independent IP).
Accurate machine time/system clock.
Open TCP and UDP 50505 ports.


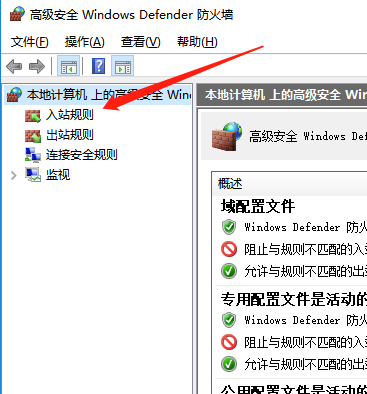
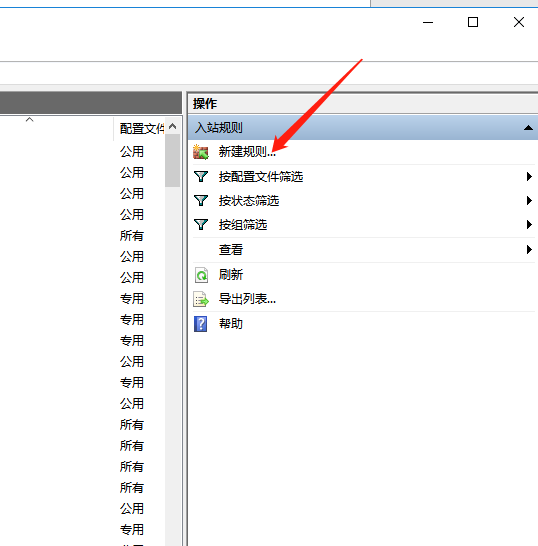

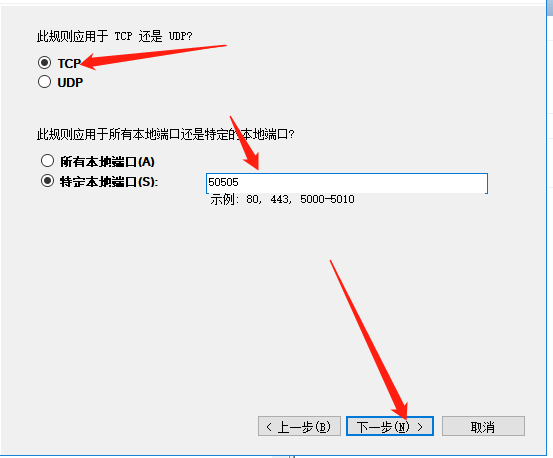
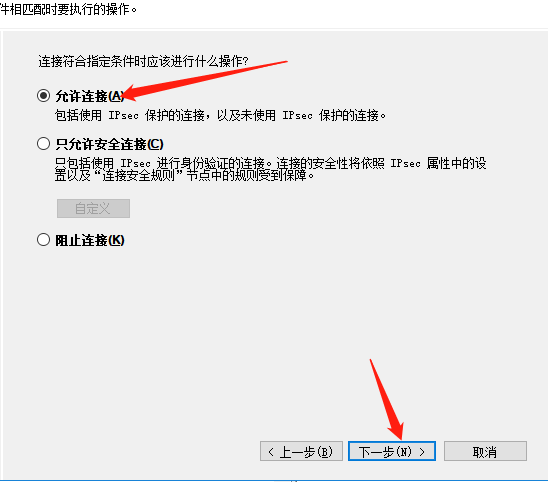
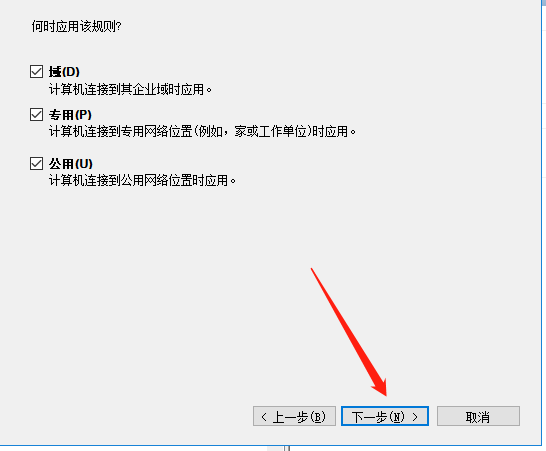

- Refer to TCP port instructions to open UDP.
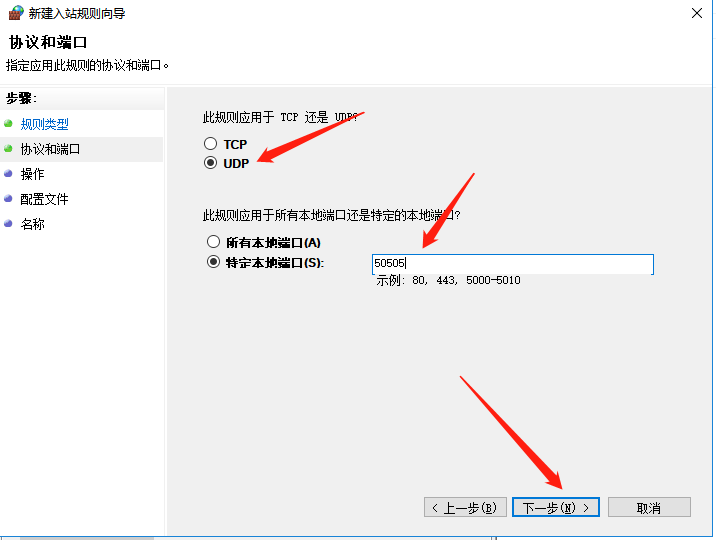
Note: UDP and TCP must be named differently.
- See Basic node—> File download for download link.
Launch in Windows
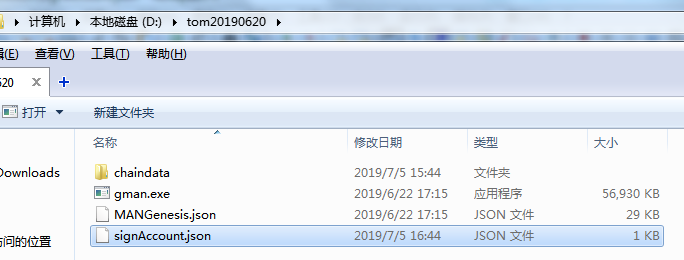
- Create a new folder. Copy MANGenesis.json (version 0620) and gman.exe. Create a subfolder named chaindata. Copy man.json to the new chaindata folder.The directory structure should be as follows:
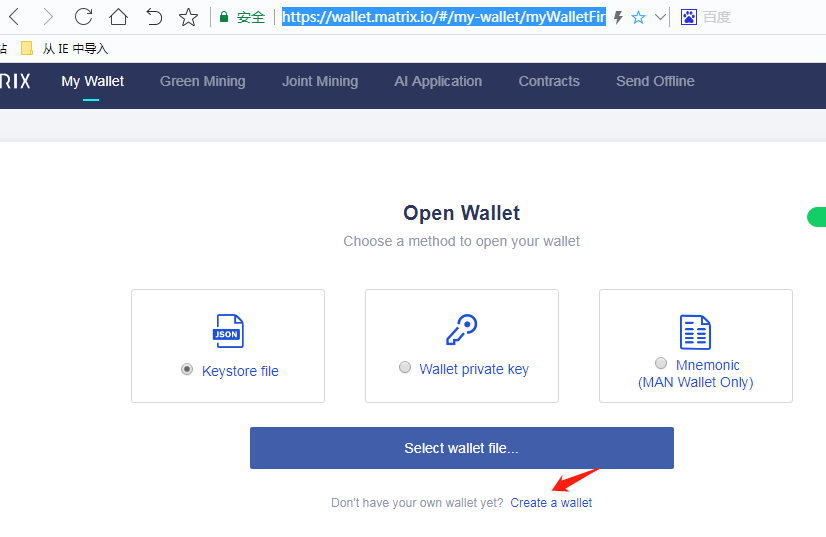
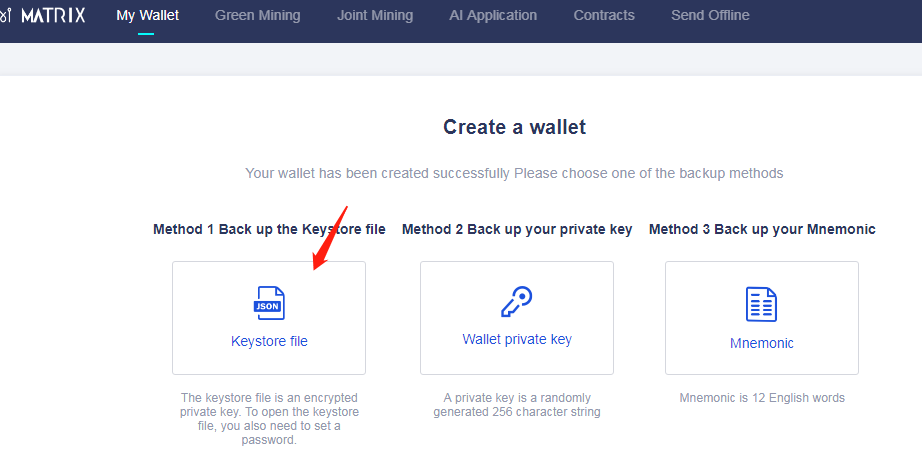
- Create a new wallet at https://wallet.matrix.io, and save keystore file and password.
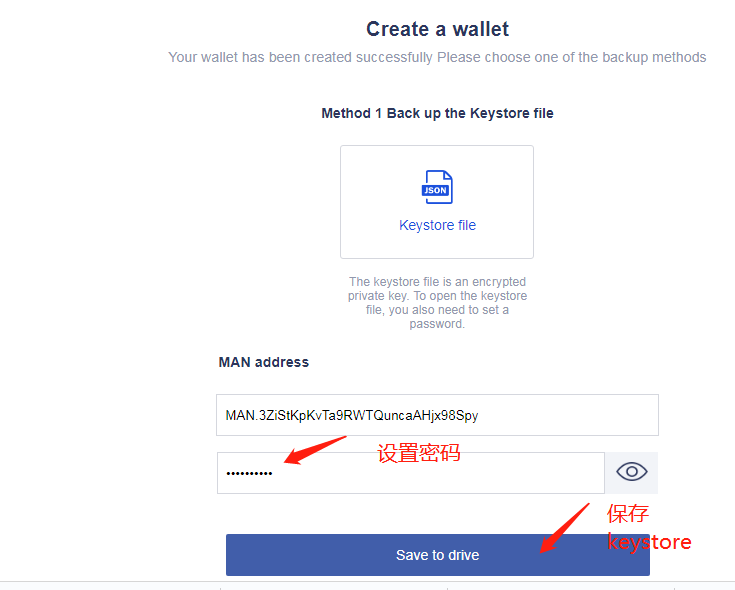
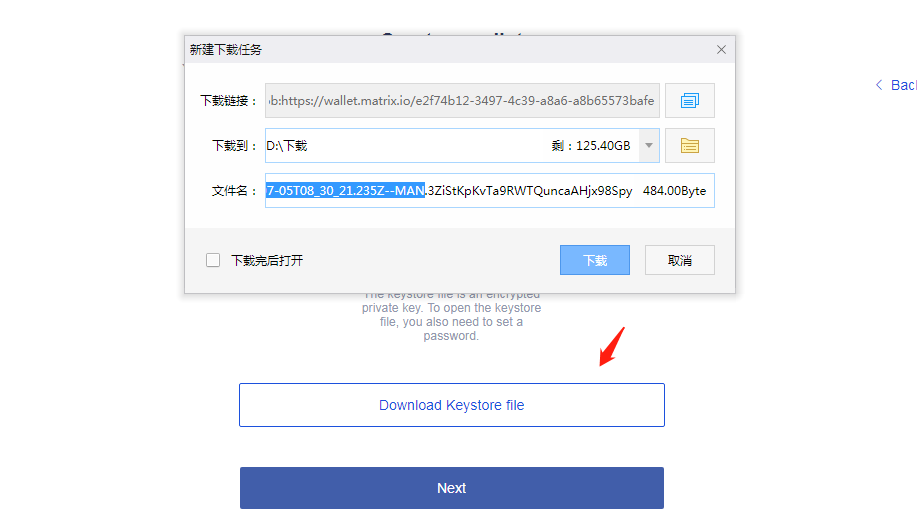
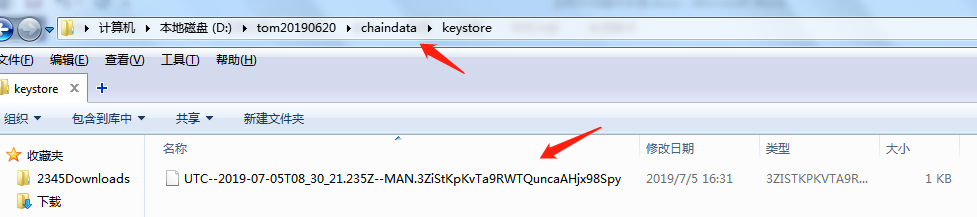
- Create a subfolder named keystore in the chaindata folder. Place your keystore file in the keystore folder.
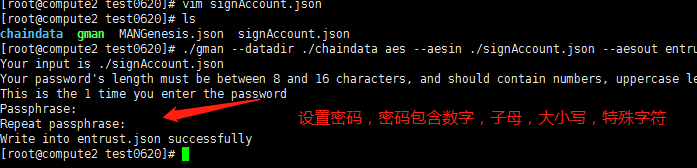
- Create the account information file called signAccount.json in the same level directory as gman.exe. Write your account address and password in signAccount.json. The format is as follows:
1 | [ |
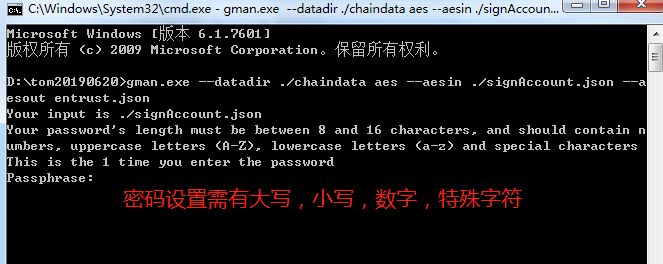
- Encrypt account files and input the following command:
1 | gman.exe --datadir ./chaindata aes --aesin ./signAccount.json --aesout entrust.json |
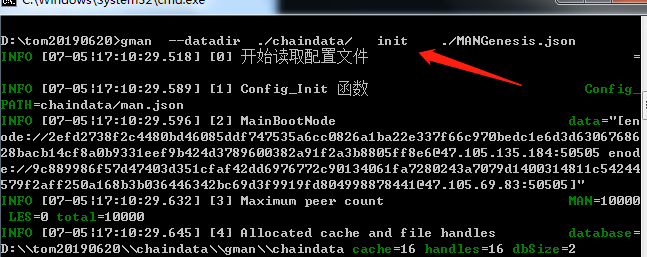
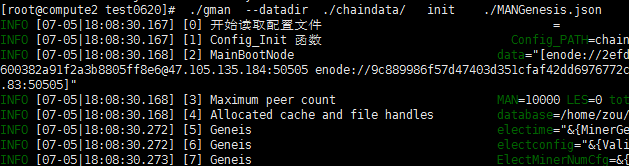
- Initialize MANGenesis.json file and execute the following instructions:
1 | .gman --datadir ./chaindata/ init ./MANGenesis.json |
- Launch gman. You need to change the address to reflect your own address.
1 | gman --datadir ./chaindata --networkid 1 --debug --verbosity 1 --manAddress [`MAN.3ZiStKpKvTa9RWTQuncaAHjx98Spy`] --entrust ./entrust.json --gcmode archive --outputinfo 1 --syncmode full |
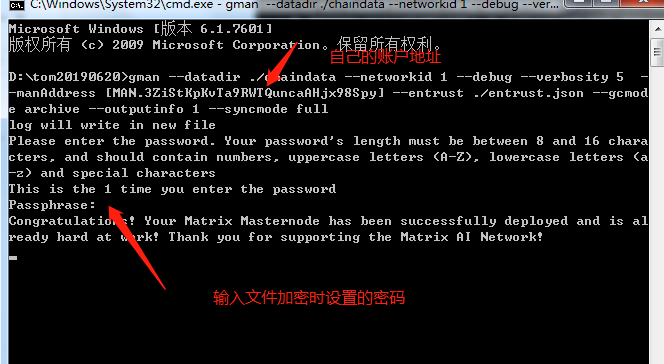
- After launching gman successfully, open another Command Prompt window and input the following to enter the interactive terminal:
1 | gman.exe attach ipc:\\.\pipe\gman.ipc |
Input net.peerCount to view the number of connected nodes; man.blockNumber to view the block height (an increasing block height indicates that synchronization with the chain has begun and that gman is successfully deployed).
Launch in Linux & Mac
Create a new wallet at https://wallet.matrix.io, and save keystore file and password.
Install lrzsz (A tool that transfer files between Linux server and Windows).
1 | yum -y install lrzsz |

- Import MANGenesis.json and gman with lrzsz.

- Create chaindata folder and place man. json into this folder.
1 | mkdir chaindata |

- Create a subfolder named keystore in the chaindata folder. Place your keystore file in the keystore folder.
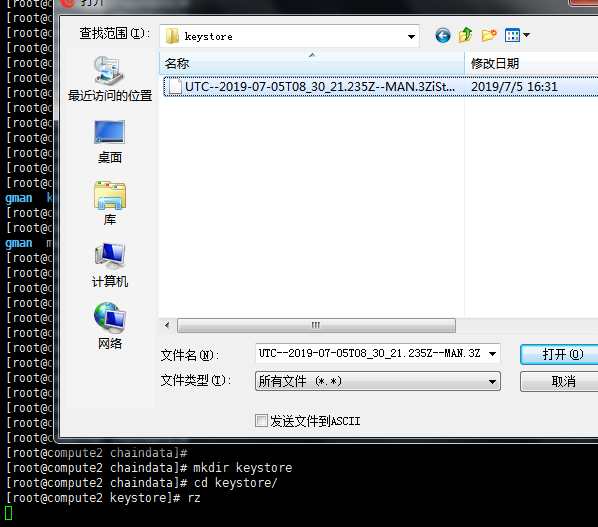
- Create the account information file signAccount.json in the same level directory of gman , and write the account address and password to signAccount.json. The format is as follows:
1 | [ |
- Modify gman permissions.
1 | chmod +x gman |
- Encrypt account files and generate cipher text.
1 | ./gman --datadir ./chaindata aes --aesin ./signAccount.json --aesout entrust.json |
- Initialize MANGenesis.json file.
1 | ./gman --datadir ./chaindata/ init ./MANGenesis.json |
- Launch gman. You need to change the address to reflect your own address.
1 | ./gman --datadir ./chaindata --networkid 1 --debug --verbosity 1 --manAddress MAN.3ZiStKpKvTa9RWTQuncaAHjx98Spy --entrust ./entrust.json --outputinfo 1 --syncmode full |

- After launching gman successfully, open another Terminal and input the following to enter the interactive terminal:
1 | ./gman attach ./chaindata/gman.ipc |
Input net.peerCount to view the number of connected nodes; man.blockNumber to view the block height (an increasing block height indicates that synchronization with the chain has begun and that gman is successfully deployed).
Router configuration (mapping port 50505)
As mentioned above, both the M (miner) node and the V (verifier) node run the GMAN program, make sure that the machine has a separate public network Ip and that the machine port 50505 is open, otherwise the mining will not succeed.
Special Scenario Home router configuration: (Note: Some routers do not support nat function, please find the relevant information configuration)
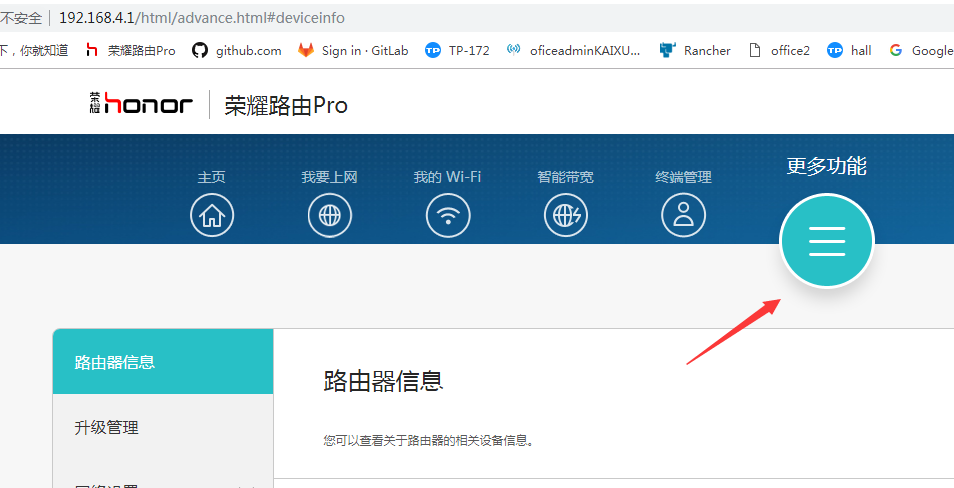
Here’s how to expose port 50505 of the mining machine, using Huawei’s router as an example:
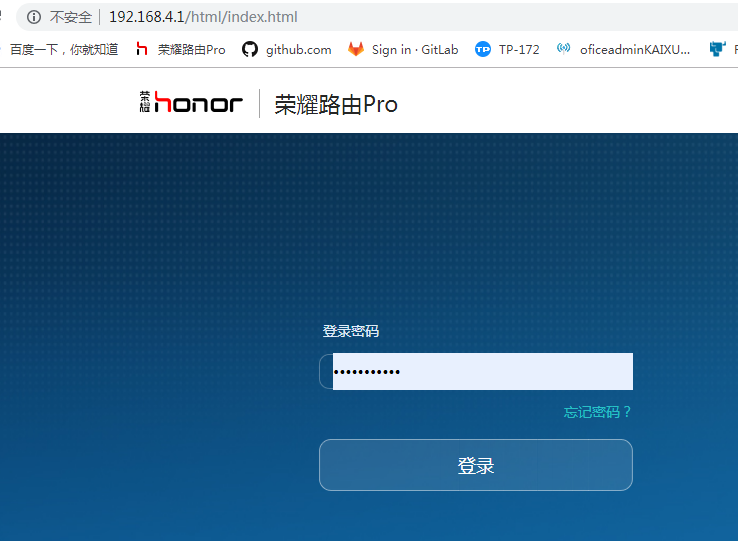
- Login router:
- Click ‘more features
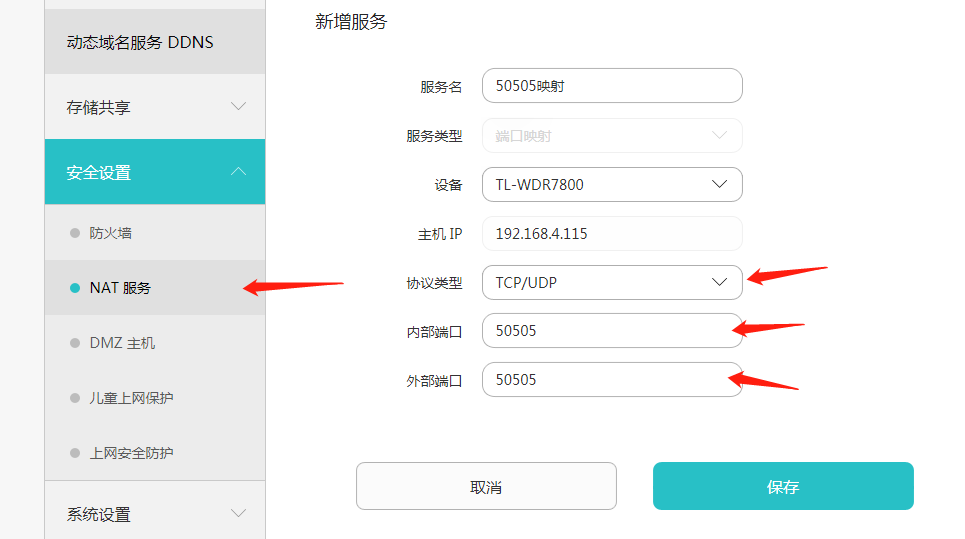
- The NAT function is usually in the security settings.
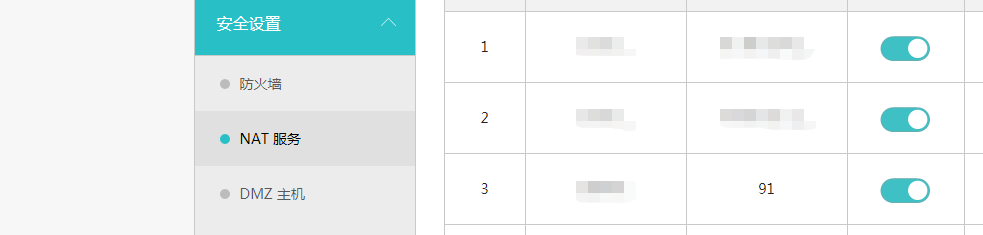
- Add Nat, port setting to 50505, host option to select current mining machine Ip, internal port 50505(protocol type to configure TCP / UDP as well).In general,only one port can be mapped to a public network device.
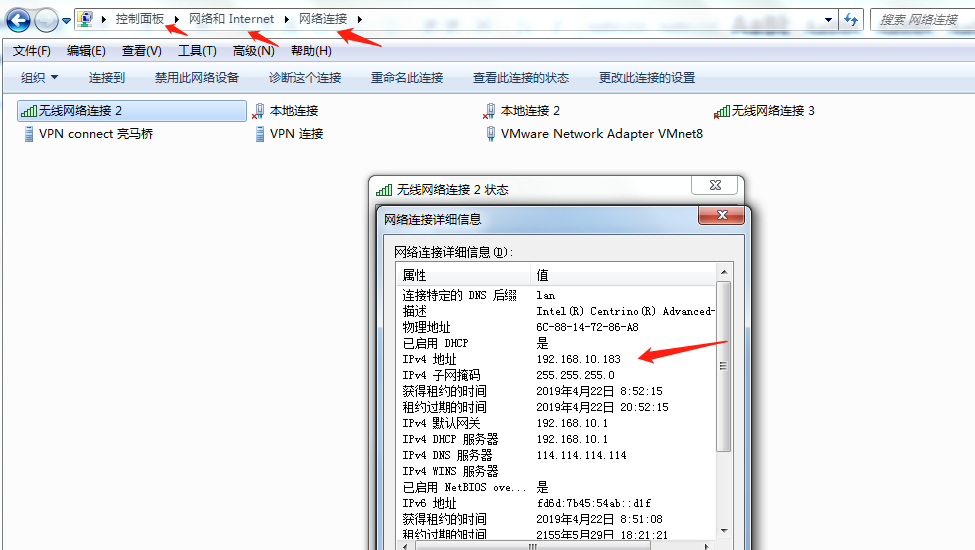
View machine IP:
- The windows machine looks directly at the network connection. View network card IP:
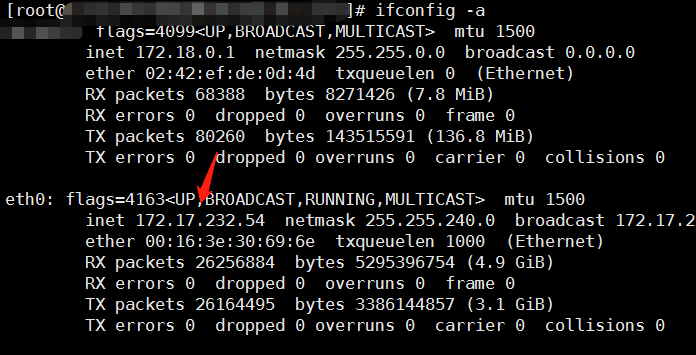
- Unix_like(MAC/centos/Ubuntu)machines:Use the command ‘sudo ifconfig –a’